Sub-Membrane Radon Mitigation Installation Explained
If your home has a crawl space and you've tested high for radon, a sub membrane radon mitigation system may be the best solution to protect your family’s health. At Radon Systems LLC, we specialize in this type of system, which is specifically designed for homes with exposed soil or gravel beneath them. But what does the installation process actually involve? Here's a step-by-step look at what you can expect.
Step 1: Site Evaluation and System Design
Before we begin any installation, our certified radon technicians perform a comprehensive inspection of your crawl space and foundation. This helps us determine the exact size, layout, and ventilation needs of your home. We'll assess the type of soil, existing moisture levels, and any obstacles that might impact the installation.
We’ll then design a custom mitigation plan that ensures maximum radon reduction while keeping airflow, structural integrity, and long-term performance in mind.
Step 2: Surface Preparation
For a sub membrane system to work effectively, we start by preparing the crawl space floor. This may involve leveling the soil, removing debris, and creating a clear, workable surface. If your crawl space already has insulation or vapor barriers installed, we’ll assess whether they need to be removed or integrated into the system.
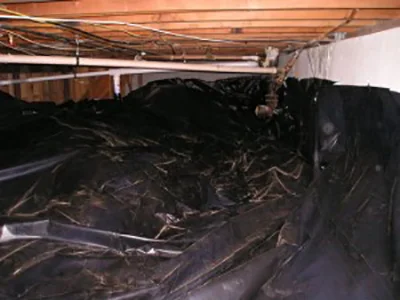
Step 3: Membrane Installation
Next comes the core of the system: the radon barrier membrane. This is a heavy-duty, airtight plastic sheeting that completely covers the exposed soil. We carefully seal the membrane along the foundation walls, around support piers, and around any plumbing or mechanical penetrations. The goal is to completely isolate the soil gases from the air inside your crawl space.
Precision is key here—every seam, corner, and edge is sealed using industry-grade tapes or adhesives to prevent radon gas from seeping through.
Step 4: Ventilation System Installation
Once the membrane is sealed, we install a vent pipe system beneath it. This piping collects the radon gas that builds up under the barrier and vents it outside your home, usually through a fan-powered system. The fan creates negative pressure beneath the membrane, drawing the gas away before it can enter your living space.
We’ll carefully route this venting system to the exterior of your home—often through a gable wall, rim joist, or roof—to meet EPA and local building code requirements.
Step 5: System Activation and Testing
After installation, the system is powered on and tested to ensure it’s working properly. Post-mitigation radon testing must be done to confirm that levels are reduced below the EPA’s action level of 4.0 pCi/L—and often much lower.
We also inspect the crawl space to ensure that all seals are holding and that the ventilation system is operating as intended.
Step 6: Ongoing Maintenance and Monitoring
While sub membrane systems are low maintenance, we recommend regular inspections to ensure continued performance. We offer service plans and support for long-term monitoring, fan maintenance, and re-testing as needed.
Ready to Breathe Easier?A sub membrane radon mitigation system is one of the most effective solutions for reducing radon in homes with crawl spaces. At Radon Systems LLC, we make the process straightforward, professional, and built to last.


